// classes in lib get all permissions by default
grant codeBase "file:${com.sun.aas.installRoot}/lib/-" {
    permission java.security.AllPermission;
};

// Core server classes get all permissions by default
grant codeBase "file:${com.sun.aas.installRoot}/modules/-" {
    permission java.security.AllPermission;
};

// Felix classes get all permissions by default
grant codeBase "file:${com.sun.aas.installRoot}/osgi/felix/bin/-" {
    permission java.security.AllPermission;
};

// iMQ classes get all permissions by default
grant codeBase "file:${com.sun.aas.imqLib}/-" {
    permission java.security.AllPermission;
};

// Derby driver classes get all permissions by default
grant codeBase "file:${com.sun.aas.derbyRoot}/lib/-" {
    permission java.security.AllPermission;
};


// permission for JDK's tools.jar to enable webservice annotation processing
// at runtime by wsgen tool:
//       permission java.lang.RuntimePermission "createClassLoader";
//
// permission for JDK's tools.jar to sign JARs at runtime for
// Java Web Start support:
//       permissions java.security.AllPermission;
// on the advice of the JDK tools folks.  Should be refined later.
grant codeBase "file:${com.sun.aas.javaRoot}/lib/tools.jar" {
    permission java.security.AllPermission;
};

//Loading MBeans from anywhere, to take care of side effects of 6235678.
grant {
    permission javax.management.MBeanTrustPermission "register" ;
};
//Loading MBeans from anywhere, to take care of side effects of 6235678.


// Basic set of required permissions granted to all remaining code
// The permission FilePermission "<<ALL FILES>>", "read,write"
// allows all applications to read and write any file in the filesystem.
// It should be changed based on real deployment needs. If you know your
// applications just need to read/write a few directories consider removing
// this permission and adding grants indicating those specific directories.
// against the codebase of your application(s).
grant {
    //Workaround for bugs #6484935, 6513799
    permission java.lang.RuntimePermission "getProtectionDomain";
    permission com.sun.corba.ee.impl.presentation.rmi.DynamicAccessPermission "access";
    permission java.util.PropertyPermission "*", "read,write";

    permission java.lang.RuntimePermission  "loadLibrary.*";
    permission java.lang.RuntimePermission  "queuePrintJob";
    permission java.net.SocketPermission    "*", "connect";
    permission java.io.FilePermission       "<<ALL FILES>>", "read,write";

        // work-around for pointbase bug 4864405
        permission java.io.FilePermission
          "${com.sun.aas.instanceRoot}${/}lib${/}databases${/}-",
           "delete";
        permission java.io.FilePermission "${java.io.tmpdir}${/}-", "delete";

    permission java.util.PropertyPermission "*", "read";

    permission java.lang.RuntimePermission    "modifyThreadGroup";
    permission java.lang.RuntimePermission    "getClassLoader";
    permission java.lang.RuntimePermission    "setContextClassLoader";
        permission javax.management.MBeanPermission
               "[com.sun.messaging.jms.*:*]", "*";
};


// Following grant block is only required by Connectors. If Connectors
// are not in use the recommendation is to remove this grant.
grant {
        permission javax.security.auth.PrivateCredentialPermission
               "javax.resource.spi.security.PasswordCredential * \"*\"","read";
};

// Following grant block is only required for Reflection. If Reflection
// is not in use the recommendation is to remove this section.
grant {
    permission java.lang.RuntimePermission "accessDeclaredMembers";
};

// Permissions to invoke CORBA objects in server
grant {
    permission com.sun.enterprise.security.CORBAObjectPermission "*", "*";
};1 Administering System Security
This chapter describes general information about administering system security.
The following topics are addressed here:
Instructions for accomplishing many of these tasks by using the Administration Console are contained in the Administration Console online help.
Information on application security is contained in "Securing Applications" in GlassFish Server Open Source Edition Application Development Guide.
About System Security in GlassFish Server
Security is about protecting data, that is, how to prevent unauthorized access or damage to data that is in storage or in transit. The GlassFish Server is built on the Java security model, which uses a sandbox where applications can run safely, without potential risk to systems or users. System security affects all the applications in the GlassFish Server environment.
The Java EE Security API specification defines portable, plug-in interfaces for authentication and identity stores, and a new injectable-type SecurityContext interface that provides an access point for programmatic security. You can use the built-in implementations of the plug-in SPIs, or write custom implementations.
System security features include the following:
Authentication
Authentication is the way in which an entity (a user, an application, or a component) determines that another entity is who it claims to be. An entity uses security credentials to authenticate itself. The credentials might be a user name and password, a digital certificate, or something else. Usually, servers or applications require clients to authenticate themselves. Additionally, clients might require servers to authenticate themselves. When authentication is bidirectional, it is called mutual authentication.
When an entity tries to access a protected resource, GlassFish Server uses the authentication mechanism configured for that resource to determine whether to grant access. For example, a user can enter a user name and password in a web browser, and if the application verifies those credentials, the user is authenticated. The user is associated with this authenticated security identity for the remainder of the session.
Authentication Types
Within its deployment descriptors, an application can specify the type of authentication that it uses. The Java EE Security API provides an alternative mechanism for configuring the type of authentication an application uses. See Java EE Security API 1.0 specification. GlassFish Server supports specifying the following types of authentication in deployment descriptors:
- BASIC
-
Uses the standard Basic Authentication Scheme as described in RFC
-
The communication protocol is HTTP (SSL optional). There is no encryption of user credentials unless using SSL. This type is not considered to be a secure method of user authentication unless used in conjunction with an encrypted communications channel, such as that provided by SSL.
-
- FORM
-
The application provides its own custom login and error pages. The communication protocol is HTTP (SSL optional). There is no encryption of user credentials unless using SSL.
- CLIENT-CERT
-
The server authenticates the client using a public key certificate. The communication protocol is HTTPS (HTTP over SSL).
- DIGEST
-
The server authenticates a user based on a user name and a password. Unlike BASIC authentication, the plaintext password is never sent over the network, although a hash of the password combined with other parameters is sent. While Digest Authentication is more secure than Basic Authentication, user names and passwords are not strongly protected, and the use of SSL is still recommended.
JSR 375 Authentication Mechanisms and Identity Stores
The Java EE Security API defines the HttpAuthenticationMechanism
interface, the IdentityStore and IdentityStoreHandler interfaces.
The HttpAuthenticationMechanism interface defines an SPI for writing
authentication mechanisms that can be provided with an application and
deployed using CDI. Developers can write their own implementations of
HttpAuthenticationMechanism to support specific authentication token
types or protocols. There are also several built-in authentication
mechanisms that perform BASIC, FORM, and Custom FORM authentication.The
HttpAuthenticationMechanism interface defines three methods -
validateRequest(), secureResponse(), and cleanSubject(). These
methods align closely with the methods defined by the JASPIC
ServerAuth interface.
The IdentityStore interface provides an abstraction of an identity
store that holds user account information including name, password,
group membership, and potentially other attributes. Implementations of
the IdentityStore interface are used to validate caller credentials,
typically username and password, and retrieve and group information.
There are built-in implementations of this SPI that can validate
credentials against external LDAP or Database identity stores.
IdentityStore is intended primarily for use by
HttpAuthenticationMechanism implementations, but could be used by
other authentication mechanisms, such as a JASPIC ServerAuthModule, or
a container’s built-in authentication mechanisms. Though
HttpAuthenticationMechanism implementations can authenticate users in
any manner they choose, the IdentityStore interface provides a
convenient mechanism. A significant advantage of using
HttpAuthenticationMechanism and IdentityStore over the declarative
mechanisms defined by the Servlet specification is that it allows an
application to control the identity stores that it authenticates
against, in a standard, portable way. You can use the built-in
implementations of the plug-in SPIs, or define custom implementations.
JSR 196 Server Authentication Modules
GlassFish Server implements the Servlet Container Profile of JSR 196 Java Authentication Service Provider Interface for Containers specification.
JSR 196 defines a standard service-provider interface (SPI) for integrating authentication mechanism implementations in message processing runtimes. JSR 196 extends the concepts of the Java Authentication and Authorization Service (JAAS) to enable pluggability of message authentication modules in message processing runtimes. The standard defines profiles that establish contracts for the use of the SPI in specific contexts.
Passwords
Passwords are your first line of defense against unauthorized access to the components and data of GlassFish Server. For Information about how to use passwords for GlassFish Server, see Administering Passwords.
Master Password and Keystores
The master password is not tied to a user account and it is not used for authentication. Instead, GlassFish Server uses the master password only to encrypt the keystore and truststore for the DAS and instances.
When you create a new GlassFish Server domain, a new self-signed certificate is generated and stored in the domain keystore and truststore. The DAS needs the master password to open these stores at startup. Similarly, the associated server instances need the master password to open their copy of these stores at startup.
If you use a utility such as keytool to modify the keystore or truststore, you must provide the master password in that case as well.
The master password is a shared password and must be the same for the DAS and all instances in the domain in order to manage the instances from the DAS. However, because GlassFish Server never transmits the master password over the network, it is up to you to keep the master password in sync between the DAS and instances.
If you change the master password, you can choose to enter the master password manually when required, or save it in a file.
Understanding Master Password Synchronization
The master password is used encrypt the keystore and truststore for the DAS and instances. The DAS needs the master password to open these stores at startup. Similarly, the associated server instances need the master password to open their copy of these stores at startup.
GlassFish Server keeps the keystore and truststore for the DAS and instances in sync, which guarantees that all copies of the stores are encrypted with the same master password at any given time.
However, GlassFish Server does not synchronize the master password itself, and it is possible that the DAS and instances might attempt to use different master passwords.
Consider the following potential scenario:
-
You create a domain and instances, using the default master password (changeit). As a result, the DAS and instances have keystores and truststores encrypted using changeit.
-
You use the
change-master-passwordsubcommand on the DAS to change the master password to ichangedit. As a result, the DAS and instance keystores and truststores are encrypted using ichangedit. -
Access to the keystore and truststore from an instance now requires the master password ichangedit. You are responsible for changing the master password as needed.
If you do not use a master password file, you assume the responsibility
for using the change-master-password subcommand on the DAS and
instances to keep the master passwords in sync. Be aware that not using
a master password file has additional considerations for the
start-instance and start-cluster subcommands, as described in
Additional Considerations for the start-instance and
start-cluster Subcommands.
If you do use a master password file, you assume the responsibility for
using the change-master-password subcommand on the DAS and instances
to keep the master password file in sync.
Using the Default Master Password
GlassFish Server uses the known phrase "changeit" as the default master password. This master password is not stored in a file. The default password is a convenience feature and provides no additional security because it is assumed to be widely known.
All GlassFish Server subcommands work as expected with the default master password and there are no synchronization issues.
Saving the Master Password to a File
The change-master-password --savemasterpassword option indicates
whether the master password should be written to the file system in the
master-password file for the DAS or a node. The default is false.
For a domain, the master password is kept in domain-dir`/master-password`.
For a node, the master-password file is kept in
nodes/`node-name/agent/master-password`. You can set a master password
at the node level and all instances created on that node will use that
master-password file. To do this, use the --nodedir option and provide
a node name.
You might want to save the master password to the file so that the
start-domain subcommand can start the server without having to prompt
the user. There are additional considerations for using a master
password with the start-instance and start-cluster subcommands, as
described in Additional Considerations for the
start-instance and start-cluster Subcommands.
The master-password file is encoded, not encrypted. You must use filesystem permissions to protect the file.
Using the Master Password When Creating a Domain
The create-domain --usemasterpassword option specifies whether the
keystore is encrypted with a master password that is built into the
system, or by a user-defined master password.
-
If false (default), the keystore is encrypted with a well-known password (changeit) that is built into GlassFish Server.
-
If true, the subcommand obtains the master password from the
AS_ADMIN_MASTERPASSWORDentry in the password file you specified in the--passwordfileoption of theasadminutility. Or, if none is defined,--usemasterpasswordprompts the user for the master password.
Administration Password
An administration password, also known as the admin password, is used to
invoke the Administration Console and the asadmin utility. As with the
default admin username, the default admin password is usually set during
installation but it can be changed. For instructions, see To
Change an Administration Password.
Encoded Passwords
Files that contain encoded passwords need to be protected using file system permissions. These files include the following:
-
domain-dir`/master-password`
This file contains the encoded master password and should be protected with file system permissions 600. -
Any password file created to pass as an argument by using the
--passwordfileargument to theasadminutility should be protected with file system permissions. Additionally, any password file being used for a transient purpose, such as setting up SSH among nodes, should be deleted after it has served its purpose.
For instructions, see To Set a Password From a File.
Web Browsers and Password Storage
Most web browsers can save login credentials entered through HTML forms. This function can be configured by the user and also by applications that employ user credentials. If the function is enabled, then credentials entered by the user are stored on their local computer and retrieved by the browser on future visits to the same application. This function is convenient for users, but can also be a security risk. The stored credentials can be captured by an attacker who gains access to the computer, either locally or through some remote compromise. Further, methods have existed whereby a malicious web site can retrieve the stored credentials for other applications, by exploiting browser vulnerabilities or through application-level cross-domain attacks.
To prevent your web browser from saving login credentials for the GlassFish Server Administration Console, choose "No" or "Never for this page" when prompted by the browser during login.
Password Aliases
To avoid storing passwords in the domain configuration file in clear text, you can create an alias for a password. This process is also known as encrypting a password. For more information, see Administering Password Aliases.
Single Sign-on
With single sign-on, a user who logs in to one application becomes
implicitly logged in to other applications that require the same
authentication information. Single sign-on is based on groups. Single
sign-on applies to web applications configured for the same realm and
virtual server. The realm is defined by the realm-name element in the
web.xml file.
On GlassFish Server, single sign-on behavior can be inherited from the HTTP Service, enabled, or disabled. By default, it is inherited from the HTTP Service. If enabled, single sign-on is enabled for web applications on this virtual server that are configured for the same realm. If disabled, single sign-on is disabled for this virtual server, and users must authenticate separately to every application on the virtual server.
Authorization
Authorization, also known as access control, is the means by which users are granted permission to access data or perform operations. After a user is authenticated, the user’s level of authorization determines what operations the owner can perform. A user’s authorization is based on the user’s role.
Roles
A role defines which applications and what parts of each application
users can access and what those users or groups can do with the
applications. For example, in a personnel application, all employees
might be able to see phone numbers and email addresses, but only
managers have access to salary information. This application would
define at least two roles: employee and manager. Only users in the
manager role are allowed to view salary information.
A role is different from a group in that a role defines a function in an
application, while a group is a set of users who are related in some
way. For example, the personnel application specify groups such as
full-time, part-time, and on-leave. Users in these groups are all
employees (the employee role). In addition, each user has its own
designation that defines an additional level of employment.
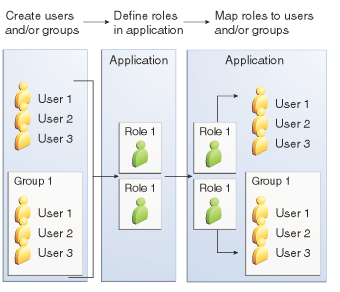
Roles are defined in the deployment descriptor for the application. The application developer or deployer maps roles to one or more groups in the deployment descriptor for each application. When the application is being packaged and deployed, the application specifies mappings between users, groups, and roles, as illustrated in Figure 1-1.
|
Note
|
By default, group principal names are mapped to roles of the same name. Therefore, the Default Principal To Role Mapping setting is enabled by default on the Security page of the GlassFish Server Administration Console. With this setting enabled, if the group name defined on GlassFish Server matches the role name defined in the application, there is no need to use the runtime deployment descriptor to provide a mapping. The application server will implicitly make this mapping, as long as the names of the groups and roles match. |
Figure 1-1 Role Mapping
Java Authorization Contract for Containers
Java Authorization Contract for Containers (JACC) is the part of the Java EE specification that defines an interface for pluggable authorization providers. This enables you to set up third-party plug-in modules to perform authorization. By default, the GlassFish Server provides a simple, file-based authorization engine that complies with the JACC specification.
This release includes Administration Console support and CLI subcommands
to create (create-jacc-provider), delete (delete-jacc-provider), and
list (list-jacc-providers) JACC providers. Administering
JACC Providers for additional information.
You can also specify additional third-party JACC providers.
Working With the server.policy Policy File
Each GlassFish Server domain has its own global Java SE policy file,
located in domain-dir`/config`. The file is named server.policy.
This section covers the following topics:
Contents of server.policy
A sample server.policy file is as follows. Comments in the file describe why various permissions are granted. These permissions are described in more detail in the next section.
|
Note
|
This server.policy file is presented for example purposes only and is subject to change. |
Changing the Default Permissions
The GlassFish Server internal server code is granted all permissions.
These grants are covered by the AllPermission grant blocks to various
parts of the server infrastructure code. Do not modify these entries.
Application permissions are granted in the default grant block. These permissions apply to all code not part of the internal server code listed previously.
The last section, beginning with the comment "Basic set of required permissions…" provides the basic set of permissions granted to all remaining code.
Depending on your GlassFish Server implementation, deleting or modifying these permissions might be appropriate.
Specifically, the following permission allows all applications to read and write all properties and read and write all files on the filesystem.
permission java.util.PropertyPermission "*", "read,write";
 permission java.io.FilePermission       "<<ALL FILES\>>", "read,write";
While this grant provides optimum flexibility, it is inherently unsecure. For enhanced security, change this permission based on your real deployment needs.
For example, consider removing this permission and assign default read
and write permissions only to the application’s install directory
(context-root). (This example uses com.sun.aas.instanceRoot, which
specifies the top level directory for a server instance.)
grant codeBase "file:${com.sun.aas.instanceRoot}/applications/MyApp/-"
{
permission java.io.FilePermission "file:${com.sun.aas.instanceRoot}
/applications/MyApp/-", "read,write";
}
For any application that needs to read and write additional directories, you would then have to explicitly allow such permissions by adding specific grants. In general, you should add extra permissions only to the applications or modules that require them, not to all applications deployed to a domain.
Additional permissions (see the embedded comments in server.policy)
are granted specifically for using connectors and reflection. If
connectors or reflection are not used in a particular domain, you should
remove these permissions, because they are otherwise unnecessary.
Auditing
Auditing is the means used to capture security-related events for the purpose of evaluating the effectiveness of security measures. GlassFish Server uses audit modules to capture audit trails of all authentication and authorization decisions. GlassFish Server provides a default audit module, as well as the ability to plug in custom audit modules. The scope of the audit module is the entire server, which means that all the applications on the server will use the same audit module.
For administration instructions, see Administering Audit Modules.
Firewalls
A firewall controls the flow of data between two or more networks, and manages the links between the networks. A firewall can consist of both hardware and software elements. The following guidelines pertain primarily to GlassFish Server:
-
In general, firewalls should be configured so that clients can access the necessary TCP/IP ports.
For example, if the HTTP listener is operating on port 8080, configure the firewall to allow HTTP requests on port 8080 only. Likewise, if HTTPS requests are set up for port 8081, you must configure the firewalls to allow HTTPS requests on port 8081. -
If direct Remote Method Invocations over Internet Inter-ORB Protocol (RMI-IIOP) access from the Internet to EJB modules is required, open the RMI-IIOP listener port as well.
|
Note
|
Opening the RMI-IIOP listener port is strongly discouraged because it creates security risks. |
-
In double firewall architecture, you must configure the outer firewall to allow for HTTP and HTTPS transactions. You must configure the inner firewall to allow the HTTP server plug-in to communicate with GlassFish Server behind the firewall.
Certificates and SSL
The following topics are addressed here:
For administration instructions, see Administering JSSE Certificates.
Certificates
Certificates, also called digital certificates, are electronic files that uniquely identify people and resources on the Internet. Certificates also enable secure, confidential communication between two entities. There are different kinds of certificates:
-
Personal certificates are used by individuals.
-
Server certificates are used to establish secure sessions between the server and clients through secure sockets layer (SSL) technology.
Certificates are based on public key cryptography, which uses pairs of digital keys (very long numbers) to encrypt, or encode, information so the information can be read only by its intended recipient. The recipient then decrypts (decodes) the information to read it. A key pair contains a public key and a private key. The owner distributes the public key and makes it available to anyone. But the owner never distributes the private key, which is always kept secret. Because the keys are mathematically related, data encrypted with one key can only be decrypted with the other key in the pair.
Certificates are issued by a trusted third party called a Certification Authority (CA). The CA is analogous to a passport office: it validates the certificate holder’s identity and signs the certificate so that it cannot be forged or tampered with. After a CA has signed a certificate, the holder can present it as proof of identity and to establish encrypted, confidential communications. Most importantly, a certificate binds the owner’s public key to the owner’s identity.
In addition to the public key, a certificate typically includes information such as the following:
-
The name of the holder and other identification, such as the URL of the web server using the certificate, or an individual’s email address
-
The name of the CA that issued the certificate
-
An expiration date
Certificates are governed by the technical specifications of the X.509
format. To verify the identity of a user in the certificate realm, the
authentication service verifies an X.509 certificate, using the common
name field of the X.509 certificate as the principal name.
Certificate Chains
A certificate chain is a series of certificates issued by successive CA certificates, eventually ending in a root CA certificate.
Web browsers are preconfigured with a set of root CA certificates that the browser automatically trusts. Any certificates from elsewhere must come with a certificate chain to verify their validity.
When a certificate is first generated, it is a self-signed certificate. A self-signed certificate is one for which the issuer (signer) is the same as the subject (the entity whose public key is being authenticated by the certificate). When the owner sends a certificate signing request (CSR) to a CA, then imports the response, the self-signed certificate is replaced by a chain of certificates. At the bottom of the chain is the certificate (reply) issued by the CA authenticating the subject’s public key. The next certificate in the chain is one that authenticates the CA’s public key. Usually, this is a self-signed certificate (that is, a certificate from the CA authenticating its own public key) and the last certificate in the chain.
In other cases, the CA can return a chain of certificates. In this situation, the bottom certificate in the chain is the same (a certificate signed by the CA, authenticating the public key of the key entry), but the second certificate in the chain is a certificate signed by a different CA, authenticating the public key of the CA to which you sent the CSR. Then, the next certificate in the chain is a certificate authenticating the second CA’s key, and so on, until a self-signed root certificate is reached. Each certificate in the chain (after the first) thus authenticates the public key of the signer of the previous certificate in the chain.
Certificate Files
During GlassFish Server installation, a certificate is generated in Java Secure Socket Extension (JSSE) format suitable for internal testing. (The certificate is self-signed.) By default, GlassFish Server stores its certificate information in certificate databases in the domain-dir`/config` directory:
- Keystore file
-
The
keystore.jksfile contains GlassFish Server certificate, including its private key. The keystore file is protected with a password.
Each keystore entry has a unique alias. After installation, the GlassFish Server keystore has a single entry with an alias ofs1as. - Truststore file
-
The
cacerts.jksfile contains the GlassFish Server trusted certificates, including public keys for other entities. For a trusted certificate, the server has confirmed that the public key in the certificate belongs to the certificate’s owner. Trusted certificates generally include those of CAs.
By default, GlassFish Server is configured with a keystore and truststore that will work with the example applications and for development purposes.
Secure Sockets Layer
Secure Sockets Layer (SSL) is the most popular standard for securing Internet communications and transactions. Secure web applications use HTTPS (HTTP over SSL). The HTTPS protocol uses certificates to ensure confidential and secure communications between server and clients. In an SSL connection, both the client and the server encrypt data before sending it. Data is decrypted upon receipt.
When a Web browser (client) wants to connect to a secure site, an SSL handshake happens, like this:
-
The browser sends a message over the network requesting a secure session (typically, by requesting a URL that begins with
httpsinstead ofhttp). -
The server responds by sending its certificate (including its public key).
-
The browser verifies that the server’s certificate is valid and is signed by a CA whose certificate is in the browser’s database (and who is trusted). It also verifies that the CA certificate has not expired.
-
If the certificate is valid, the browser generates a one time, unique session key and encrypts it with the server’s public key. The browser then sends the encrypted session key to the server so that they both have a copy.
-
The server decrypts the message using its private key and recovers the session key.
After the handshake, the client has verified the identity of the Web site, and only the client and the Web server have a copy of the session key. From this point forward, the client and the server use the session key to encrypt all their communications with each other. Thus, their communications are ensured to be secure.
The newest version of the SSL standard is called Transport Layer Security (TLS). The GlassFish Server supports the SSL 3.0 and the TLS 1.0 encryption protocols.
To use SSL, GlassFish Server must have a certificate for each external interface or IP address that accepts secure connections. The HTTPS service of most web servers will not run unless a certificate has been installed. For instructions on applying SSL to HTTP listeners, see "To Configure an HTTP Listener for SSL" in GlassFish Server Open Source Edition Administration Guide.
Ciphers
A cipher is a cryptographic algorithm used for encryption or decryption. SSL and TLS protocols support a variety of ciphers used to authenticate the server and client to each other, transmit certificates, and establish session keys.
Some ciphers are stronger and more secure than others. Clients and servers can support different cipher suites. During a secure connection, the client and the server agree to use the strongest cipher that they both have enabled for communication, so it is usually sufficient to enable all ciphers.
Name-based Virtual Hosts
Using name-based virtual hosts for a secure application can be problematic. This is a design limitation of the SSL protocol itself. The SSL handshake, where the client browser accepts the server certificate, must occur before the HTTP request is accessed. As a result, the request information containing the virtual host name cannot be determined prior to authentication, and it is therefore not possible to assign multiple certificates to a single IP address.
If all virtual hosts on a single IP address need to authenticate against the same certificate, the addition of multiple virtual hosts probably will not interfere with normal SSL operations on the server. Be aware, however, that most browsers will compare the server’s domain name against the domain name listed in the certificate, if any (applicable primarily to official, CA-signed certificates). If the domain names do not match, these browsers display a warning. In general, only address-based virtual hosts are commonly used with SSL in a production environment.
Custom Authentication of Client Certificate in SSL Mutual Authentication
Release 4.0 of GlassFish Server extends the Certificate realm to allow custom authentication and group assignment based on the client certificate received as part of SSL mutual (two-way) authentication.
As in previous releases, you can create only one certificate realm.
However, you can now use a convenient abstract base class to configure a
JAAS LoginModule for the Certificate realm. Specifically, your
LoginModule can now extend
com.sun.appserv.security.AppservCertificateLoginModule. When you do
this, you need to implement only the authenticateUser method and call
the commitUserAuthentication method to signify success.
This section describes the following topics:
Understanding the AppservCertificateLoginModule Class
The AppservCertificateLoginModule class provides some convenience
methods for accessing the certificates, the application name and so
forth, and for adding the group principals to the subject. The
convenience methods include the following:
getAppName()-
Returns the name of the application to be authenticated. This may be useful when a single LoginModule has to handle multiple applications that use certificates.
getCerts()-
Returns the certificate chain as an array of
java.security.cert.X509Certificatecertificates. getX500Principal()-
Returns the Distinguished principal from the first certificate in the chain.
getSubject()-
Returns the subject that is being authenticated.
commitUserAuthentication(final String[] groups)-
This method sets the authentication status to success if the groups parameter is non-null. Note that this method is called after the authentication has succeeded. If authentication failed, do not call this method.
|
Note
|
You do not have to extend the convenience base class, you can extend the
JAAS LoginModule |
Example AppservCertificateLoginModule Code
Example 1-1 shows a sample instance of the AppservCertificateLoginModule class.
Take note of the following points from the example:
-
The
getX500Principal()method returns the subject (subject distinguished name) value from the first certificate in the client certificate chain as anX500Principal. -
From that
X500Principal, thegetName()method then returns a string representation of the X.500 distinguished name using the format defined in RFC 2253. -
The example uses the
getAppName()method to determine the application name. It also determines the organizational unit (OU) from the distinguished name. -
The example concatenates the application name with the value of
OU, and uses it as the group name in thecommitUserAuthenticationmethod.
Example 1-1 Sample AppservCertificateLoginModule Code
/**
 *
 * @author nasradu8
 */
public class CertificateLM extends AppservCertificateLoginModule {

    @Override
    protected void authenticateUser() throws LoginException {
        // Get the distinguished name from the X500Principal.
        String dname = getX500Principal().getName();
        StringTokenizer st = new StringTokenizer(dname, "B \t\n\r\f,");
        while (st.hasMoreTokens()) {
            String next = st.nextToken();
            // Set the appname:OU as the group.
            // At this point, one has the application name and the DN of
            // the certificate. A suitable login decision can be made here.
            if (next.startsWith("OU=")) {
            commitUserAuthentication(new String[]{getAppName()
+ ":" + next.substring(3)});
                return;
            }
        }
        throw new LoginException("No OU found.");
    }
}
Setting the JAAS Context
After you create your LoginModule, you must plug it in to a jaas-context, which you then specify as a parameter to the certificate realm in GlassFish Server.
To do this, perform the following steps:
-
Specify a new jaas-context for the Certificate realm in the file domain-dir`/config/login.conf`. For example, using the
CertificateLMclass from Example AppservCertificateLoginModule Code:
certRealm {
    com.sun.blogs.certificate.login.CertificateLM required;
};
-
Specify this jaas-context as a parameter to the
setsubcommand in theconfigs.config.server-config.security-service.auth-realm.certificate.property.jaas-context=<jaas-context-name> property. For example:
asadmin>set configs.config.server-config.security-service.auth-realm.certificate.property.jaas-context=certRealm
configs.config.server-config.security-service.auth-realm.certificate.property.jaas-context=certRealm
Command set executed successfully. -
Optionally, get the value you just set to make sure that it is correct.
asadmin>get configs.config.server-config.security-service.auth-realm.certificate.property.jaas-context
configs.config.server-config.security-service.auth-realm.certificate.property.jaas-context=certRealm
Command get executed successfully.
Tools for Managing System Security
GlassFish Server provides the following tools for managing system security:
- Administration Console
-
The Administration Console is a browser-based utility used to configure security for the entire server. Tasks include managing certificates, users, groups, and realms, and performing other system-wide security tasks. For a general introduction to the Administration Console, see "Administration Console" in GlassFish Server Open Source Edition Administration Guide.
- The
asadminutility -
The
asadmincommand-line utility performs many of the same tasks as the Administration Console. You might be able to do some things with theasadminutility that you cannot do with the Administration Console. For a general introduction toasadmin, see "asadmin Utility" in GlassFish Server Open Source Edition Administration Guide. - The
keytoolutility -
The
keytoolJava Platform, Standard Edition (Java SE) command-line utility is used for managing digital certificates and key pairs. For more information, see Administering JSSE Certificates. - The
policytoolutility -
The
policytoolJava SE graphical utility is used for managing system-wide Java security policies. As an administrator, you rarely usepolicytool.
Administering Passwords
There are multiple ways to administer passwords. You can rely on
administrators to keep passwords secret and change the passwords
regularly. You can set up files for storing passwords so that asadmin
subcommands can access these files rather than having users type the
commands. You can encrypt passwords by setting up aliases so that
sensitive passwords are not visible in the domain.xml file.
The following topics are addressed here:
To Change the Master Password
The master password gives access to the keystore used with the domain. This password is not tied to a UNIX user. You should treat this overall shared password as sensitive data. GlassFish Server never uses it for authentication and never transmits it over the network.
You can choose to type the password manually when required, or to
obscure the password in a password file. If there is no password file,
you are prompted for the master password. If there is a password file,
but you want to change access to require prompting, remove the file. The
default master password is changeit.
When changing the master password, it has to be changed on all nodes as well as on the DAS. The master password on nodes is only stored once in the node, for all instances that are on that node.
Use the change-master-password subcommand in local mode to modify the
master password.
|
Note
|
If you change the master password and are not using a master password
file, the |
When the master password is saved, it is saved in the master-password
file.
Before You Begin
This subcommand will not work unless the domain is stopped.
-
Stop the domain whose password you are changing.
See "To Stop a Domain" in GlassFish Server Open Source Edition Administration Guide. -
Change the master password for the domain by using the
change-master-passwordsubcommand.
You are prompted for the old and new passwords. All dependent items are re-encrypted. -
Start the domain.
See "To Start a Domain" in GlassFish Server Open Source Edition Administration Guide.
Example 1-2 Changing the Master Password
The change-master-password subcommand is interactive in that you are
prompted for the old master password as well as the new master password.
This example changes the master password for domain44ps:
asadmin> change-master-password domain44psIf you have already logged into the domain using the
login subcommand, you are prompted for the new
master password:
Please enter the new master password>
Please enter the new master password again>
If you are not logged into the domain, you are prompted for both the old and the new master passwords:
Please enter the master password>
Please enter the new master password>
Please enter the new master password again>
Information similar to the following is displayed:
Master password changed for domain44psSee Also
You can also view the full syntax and options of the subcommand by
typing asadmin --help change-master-password at the command line.
Additional Considerations for the start-instance and start-cluster
Subcommands
^^^^^^^^^^^^^^^^^^^^^^^^^^^^
If you change the master password for DAS, the start-domain and
start-local-instance subcommands allow you to provide it during domain
or instance startup in one of three ways:
-
Via the master-password file
-
By entering it interactively
-
Via the
asadminpasswordfile
The start-instance and start-cluster subcommands are more
problematic. If you create a domain with a master password other than
the default, an associated remote instance or cluster must have access
to the master password in order to start. However, for security reasons
GlassFish Server never transmits the master password or the master
password file over the network.
Consider the following scenario:
-
Change the master password on the DAS and save it with
--savemasterpassword. -
Create an instance on another host using the subcommand
create-instance. GlassFish Server copies the keystore and truststore from the DAS to the instance, but it does not copy the master password file. -
Try to start the instance using the
start-instancesubcommand. An error results.
The start-instance command is looking for the file master-password in
the node directory on the instance machine, and it is not there by
default. Therefore, the subcommand fails.
You can use the change-master-password subcommand to make sure the
correct password is used in this password file, as described in
Using start-instance and start-cluster With a Password
File.
|
Note
|
The |
Using start-instance and start-cluster With a Password File
Assume that you have changed the master password on the DAS and you want to make the same change for all instances.
The start-instance and`start-cluster` subcommands automatically use
the master password file if it exists in the instance filesystem. You
can use the change-master-password subcommand to make sure the
password file exists and that the correct password is used.
-
From the DAS, create a domain and set the master password.
asadmin>create-domain --savemasterpassword truedomain-name -
Start the domain.
asadmin>``start-domaindomain-name -
Create a node that is enabled for communication over secure shell (SSH).
asadmin>create-node-ssh --nodehosthost-name --installdir/some-dir node-name -
Create an instance on the node.
asadmin>create-instance --nodenode-name instance-name -
Before you start the instance, on the instance machine run
change-master-passwordwith the---savemasterpasswordoption to create a file calledmaster-passwordin the agents directory to access the keystores. (Thestart-instancesubcommand is looking for a file calledmaster-passwordin the agents directory to access the stores.)
asadmin>change-master-password --savemasterpassword true --nodedir/some-dir node-name
You are prompted to enter the current and new master password:
Enter the current master password>
Enter the new master password>
Enter the new master password again>
Command change-master-password executed successfully.
Remember that when you created the domain you specified a new master password. This master password was then used to encrypt the keystore and truststore for the DAS, and these stores were copied to the instance as a result of thecreate-instancesubcommand.
Therefore, enter the master password you set when you created the domain as both the current master password and again as the new master password. You enter it as the new master password because you do not want to change the master password for the instance and make it out of sync with the DAS. -
Run start-instance from the DAS.
asadmin>start-instanceinstance-name
The master password file is associated with the node and not with an instance. After the master password file exists in the node directory on the instance machine, additional instances can be created, started and stopped from the DAS.
To Change an Administration Password
Use the change-admin-password subcommand in remote mode to change an
administration password. The default administration user is admin. You
are prompted for the old and new admin passwords, with confirmation. The
passwords are not echoed to the display.
|
Note
|
For the zip bundle of GlassFish Server 5.0, the default administrator
login is |
|
Note
|
If there is a single user called |
|
Note
|
If secure administration is enabled as described in Running Secure Admin, you cannot change an administration password to a blank value. |
Encrypting the admin password is strongly encouraged.
-
Change the admin password by using the
change-admin-passwordsubcommand. -
Enter the old and new admin passwords when prompted.
-
Restart GlassFish Server.
See "To Restart a Domain" in GlassFish Server Open Source Edition Administration Guide.
Example 1-3 Changing the Admin Password
This example changes the admin password for user anonymous from
adminadmin to newadmin:
asadmin> change-admin-password --username anonymousYou are prompted to enter the old and the new admin passwords:
Enter admin password>adminadmin
Enter new admin password>newadmin
Enter new admin password again>newadmin
Information similar to the following is displayed:
Command change-admin-password executed successfully.See Also
You can also view the full syntax and options of the subcommand by
typing asadmin help change-admin-password at the command line.
To Set a Password From a File
Instead of typing the password at the command line, you can access the
password for a command from a file such as passwords.txt. The
--passwordfile option of the asadmin utility takes the name of the
file that contains the passwords. The entry for a password in the file
must have the AS_ADMIN_ prefix followed by the password name in
uppercase letters.
|
Note
|
Any password file created to pass as an argument by using the
|
For a list of the types of passwords that can be specified, see the
asadmin(1M) help page.
AS_ADMIN_MASTERPASSWORD
AS_ADMIN_USERPASSWORD
AS_ADMIN_ALIASPASSWORD-
Edit the password file.
For example, to specify the password for the domain administration server (DAS), add an entry similar to the following to the password file, whereadminadminis the administrator password:
AS_ADMIN_PASSWORD=adminadmin
-
Save the password file.
You can now specify the password file in anasadminsubcommand. In this example,passwords.txtis the file that contains the password:
asadmin>delete-jdbc-resource --user admin --passwordfile passwords.txt jdbc/DerbyPool
Troubleshooting
If AS_ADMIN_PASSWORD has been exported to the global environment,
specifying the --passwordfile option will produce a warning about
using the --passwordfile option. To prevent this warning situation
from happening, unset AS_ADMIN_PASSWORD.
Administering Password Aliases
A password alias is used to indirectly access a password so that the
password itself does not appear in cleartext in the domain’s
domain.xml configuration file.
Storing passwords in cleartext format in system configuration files is common in many open source projects. In addition to GlassFish Server, Apache Tomcat, Maven, and Subversion, among others, store and pass passwords in cleartext format. However, storing and passing passwords in cleartext can be a security risk, and may violate some corporate security policies. In such cases, you can use password aliases.
The following topics are addressed here:
To Create a Password Alias
Use the create-password-alias subcommand in remote mode to create an
alias for a password in the domain’s keystore. The password
corresponding to the alias name is stored in an encrypted form in the
domain configuration file. The create-password-alias subcommand takes
both a secure interactive form, in which users are prompted for all
information, and a more script-friendly form, in which the password is
propagated on the command line.
You can also use the set subcommand to remove and
replace the password in the configuration file. For example:
asadmin set --user admin server.jms-service.jms-host.default_JMS_host.
admin-password='${ALIAS=jms-password}'-
Ensure that the server is running.
Remote subcommands require a running server. -
Go to the directory where the configuration file resides.
By default, the configuration file is located in domain-dir`/config`. -
Create the password alias by using the
create-password-aliassubcommand. -
Type the password for the alias when prompted.
-
Add the alias to a password file.
For example, assume the use of a password file such aspasswords.txt. Assume further that you want to add an alias for theAS_ADMIN_USERPASSWORDentry that is read by thecreate-file-usersubcommand. You would add the following line to the password file: `AS_ADMIN_USERPASSWORD=${ALIAS=`user-password-alias}, where user-password-alias is the new password alias. -
To continue the example of the previous step, you would then run the
create-file-usersubcommand.
You could use this method to create several users (user1, user2, and so forth), all with the same password.
asadmin>--passwordfile``passwords.txt create-file-useruser1
Example 1-4 Creating a Password Alias
This example creates the new jms-password alias for the admin user:
asadmin> create-password-alias --user admin jms-passwordYou are prompted to type the password for the alias:
Please enter the alias password>secret-password
Please enter the alias password again>secret-password
Command create-password-alias executed successfully.
See Also
You can also view the full syntax and options of the subcommand by
typing asadmin help create-password-alias at the command line.
To List Password Aliases
Use the list-password-aliases subcommand in remote mode to list
existing the password aliases.
-
Ensure that the server is running.
Remote subcommands require a running server. -
List password aliases by using the
list-password-aliasessubcommand.
Example 1-5 Listing Password Aliases
This example lists the existing password aliases:
asadmin> list-password aliases
jmspassword-alias
Command list-password-aliases executed successfully
See Also
You can also view the full syntax and options of the subcommand by
typing asadmin help list-password-aliases at the command line.
To Delete a Password Alias
Use the delete-password-alias subcommand in remote mode to delete an
existing password alias.
-
Ensure that the server is running.
Remote subcommands require a running server. -
List all aliases by using the
list-password-aliasessubcommand. -
Delete a password alias by using the
list-password-aliasessubcommand.
Example 1-6 Deleting a Password Alias
This example deletes the password alias jmspassword-alias:
asadmin> delete-password-alias jmspassword-alias
Command list-password-aliases executed successfully
See Also
You can also view the full syntax and options of the subcommand by
typing asadmin help delete-password-alias at the command line.
To Update a Password Alias
Use the update-password-alias subcommand in remote mode to change the
password for an existing password alias. The update-password-alias
subcommand takes both a secure interactive form, in which the user is
prompted for all information, and a more script-friendly form, in which
the password is propagated on the command line.
-
Ensure that the server is running.
Remote subcommands require a running server. -
Update an alias by using the
update-password-aliassubcommand. -
Type the password when prompted.
Example 1-7 Updating a Password Alias
This example updates the password for the jmspassword-alias alias:
asadmin> update-password-alias jsmpassword-aliasYou are prompted to type the new password for the alias:
Please enter the alias password>new-secret-password
Please enter the alias password again>new-secret-password
Command update-password-alias executed successfully
See Also
You can also view the full syntax and options of the subcommand by
typing asadmin help update-password-alias at the command line.
Administering Audit Modules
The following topics are addressed here:
To Create an Audit Module
Use the create-audit-module subcommand in remote mode to create an
audit module for the add-on component that implements the audit
capabilities.
-
Ensure that the server is running.
Remote subcommands require a running server. -
Create an audit module by using the
create-audit-modulesubcommand.
Information about properties for this subcommand is included in this help page.
Example 1-8 Creating an Audit Module
This example creates an audit module named sampleAuditModule:
asadmin> create-audit-module
--classname com.sun.appserv.auditmodule --property defaultuser=
admin:Password=admin sampleAuditModule
Command create-audit-module executed successfully.
See Also
You can also view the full syntax and options of the subcommand by
typing asadmin help create-audit-module at the command line.
To List Audit Modules
Use the list-audit-modules subcommand in remote mode to list the audit
modules on one of the following targets:
-
Server instance,
server(the default) -
Specified server instance
-
Specified configuration
-
Ensure that the server is running.
Remote subcommands require a running server. -
List the audit modules by using the
list-audit-modulessubcommand.
-
Example 1-9 Listing Audit Modules
This example lists the audit modules on localhost:
asadmin> list-audit-modules
audit-module : default
audit-module : sampleAuditModule
Command list-audit-modules executed successfully.
See Also
You can also view the full syntax and options of the subcommand by
typing asadmin help list-audit-modules at the command line.
To Delete an Audit Module
Use the delete-audit-module subcommand in remote mode to delete an
existing audit module.
-
Ensure that the server is running.
Remote subcommands require a running server. -
List the audit modules by using the
list-audit-modulessubcommand. -
Delete an audit module by using the
delete-audit-modulesubcommand.
Example 1-10 Deleting an Audit Module
This example deletes sampleAuditModule:
asadmin> delete-audit-module sampleAuditModule
Command delete-audit-module executed successfully.
Administering JSSE Certificates
In the developer profile, the GlassFish Server 5.0 uses the JSSE format on the server side to manage certificates and key stores. In all profiles, the client side (appclient or stand-alone) uses the JSSE format.
The Java SE SDK ships with the keytool utility, which enables you to
set up and work with Java Secure Socket Extension (JSSE) digital
certificates. You can administer public/private key pairs and associated
certificates, and cache the public keys (in the form of certificates) of
their communicating peers.
The following topics are addressed here:
To Generate a Certificate by Using keytool
By default, the keytool utility creates a keystore file in the
directory where the utility is run.
Before You Begin
To run the keytool utility, your shell environment must be configured
so that the Java SE /bin directory is in the path, otherwise the full
path to the utility must be present on the command line.
-
Change to the directory that contains the keystore and truststore files.
Always generate the certificate in the directory containing the keystore and truststore files. The default is domain-dir`/config`. -
Generate the certificate in the keystore file,
keystore.jks, using the following command format:
keytool -genkey -alias keyAlias-keyalg RSA
 -keypass changeit
 -storepass changeit
keystore keystore.jks
Use any unique name as your keyAlias. If you have changed the keystore
or private key password from the default (changeit), substitute the
new password for changeit. The default key password alias is s1as.
A prompt appears that asks for your name, organization, and other
information.
3. Export the generated certificate to the server.cer file (or
client.cer if you prefer), using the following command format:
keytool -export -alias keyAlias-storepass changeit
 -file server.cer
-keystore keystore.jks-
If a certificate signed by a certificate authority is required, see To Sign a Certificate by Using
keytool. -
Create the
cacerts.jkstruststore file and add the certificate to the truststore, using the following command format:
keytool -import -v -trustcacerts
-alias keyAlias
 -file server.cer
-keystore cacerts.jks
 -keypass changeit
If you have changed the keystore or private key password from the
default (changeit), substitute the new password.
Information about the certificate is displayed and a prompt appears
asking if you want to trust the certificate.
6. Type yes, then press Enter.
Information similar to the following is displayed:
Certificate was added to keystore
[Saving cacerts.jks]-
To apply your changes, restart GlassFish Server. See "To Restart a Domain" in GlassFish Server Open Source Edition Administration Guide.
Example 1-11 Creating a Self-Signed Certificate in a JKS Keystore by Using an RSA Key Algorithm
RSA is public-key encryption technology developed by RSA Data Security, Inc.
keytool -genkey -noprompt -trustcacerts -keyalg RSA -alias ${cert.alias}
-dname ${dn.name} -keypass ${key.pass} -keystore ${keystore.file}
-storepass ${keystore.pass}
Example 1-12 Creating a Self-Signed Certificate in a JKS Keystore by Using a Default Key Algorithm
keytool -genkey -noprompt -trustcacerts -alias ${cert.alias} -dname
${dn.name} -keypass ${key.pass} -keystore ${keystore.file} -storepass
${keystore.pass}
Example 1-13 Displaying Available Certificates From a JKS Keystore
keytool -list -v -keystore ${keystore.file} -storepass ${keystore.pass}Example 1-14 Displaying Certificate information From a JKS Keystore
keytool -list -v -alias ${cert.alias} -keystore ${keystore.file}
-storepass ${keystore.pass}
See Also
To Sign a Certificate by Using keytool
After creating a certificate, the owner must sign the certificate to prevent forgery. E-commerce sites, or those for which authentication of identity is important, can purchase a certificate from a well-known Certificate Authority (CA).
|
Note
|
If authentication is not a concern, for example if private secure communications are all that is required, you can save the time and expense involved in obtaining a CA certificate by using a self-signed certificate. |
-
Delete the default self-signed certificate:
keytool -delete -alias s1as -keystore keystore.jks -storepass <store_passwd>
where <store_passwd> is the password for the keystore. For example,
"mypass". Note that s1as is the default alias of the GlassFish Server
keystore.
2. Generate a new key pair for the application server:
keytool -genkeypair -keyalg <key_alg> -keystore keystore.jks
-validity <val_days> -alias s1as
where <key_alg> is the algorithm to be used for generating the key pair,
for example RSA, and <val_days> is the number of days that the
certificate should be considered valid. For example, 365.
In addition to generating a key pair, the command wraps the public key
into a self-signed certificate and stores the certificate and the
private key in a new keystore entry identified by the alias.
For HTTPS hostname verification, it is important to ensure that the name
of the certificate (CN) matches the fully-qualified hostname of your
site (fully-qualified domain name). If the names do not match, clients
connecting to the server will see a security alert stating that the name
of the certificate does not match the name of the site.
3. Generate a Certificate Signing Request (CSR):
keytool -certreq -alias s1as -file <certreq_file> -keystore keystore.jks
-storepass <store_passwd>
where <certreq_file> is the file in which the CSR is stored (for
example, s1as.csr) and <store_passwd> is the password for the
keystore. For example, changeit.
4. Submit the CSR to a Certificate Authority such as VeriSign (at
http://www.verisign.com/ssl/buy-ssl-certificates/index.html). In
response, you should receive a signed server certificate. Make sure to
import into your browser the CA certificate of the CA (if not already
present) and any intermediate certificates indicated by the CA in the
reply.
5. Store the signed server certificate from the CA, including the
markers -----BEGIN CERTIFICATE----- and -----END CERTIFICATE-----,
into a file such as s1as.cert. Download the CA certificate and any
intermediate CA certificates and store them in local files.
6. Import the CA certificate (if not already present) and any
intermediate CA certificates (if not already present) indicated by the
CA into the truststore cacerts.jks:
keytool -import -v -trustcacerts -alias <CA-Name> -file ca.cert
-keystore cacerts.jks -storepass <store_passwd>-
Replace the original self-signed certificate with the certificate you obtained from the CA, as stored in a file such as
s1as.cert:
keytool -import -v -trustcacerts -alias s1as -file s1as.cert
   -keystore keystore.jks -storepass <store_passwd>
When you import the certificate using the same original alias`s1as`,
keytool treats it as a command to replace the original certificate with
the certificate obtained as a reply to a CSR.
After running the command, you should see that the certificate s1as in
the keystore is no longer the original self-signed certificate, but is
now the response certificate from the CA.
Consider the following example that compares an original s1as
certificate with a new s1as certificate obtained from VeriSign:
Original s1as (self-signed):

Owner: CN=FQDN, OU=Sun Java System Application Server, O=Sun
Microsystems, L=Santa Clara, ST=California, C=US
Issuer: CN=KUMAR, OU=Sun Java System Application Server, O=Su
n Microsystems, L=Santa Clara, ST=California, C=US
Serial number: 472acd34
Valid from: Fri Nov 02 12:39:40 GMT+05:30 2007 until: Mon Oct
30 12:39:40 GMT+05:30 2017

New s1as (contains signed cert from CA):

Owner: CN=FQDN, OU=Terms of use at www.verisign.com/cps/test
ca (c)05, OU=Sun Java System Application Server, O=Sun Micros
ystems, L=Santa Clara, ST=California, C=US
Issuer: CN=VeriSign Trial Secure Server Test CA, OU=Terms of
use at https://www.verisign.com/cps/testca (c)05, OU="For Test
Purposes Only. No assurances.", O="VeriSign, Inc.", C=US
Serial number: 1375de18b223508c2cb0123059d5c440
Valid from: Sun Nov 11 05:30:00 GMT+05:30 2007 until: Mon Nov
26 05:29:59 GMT+05:30 2007-
To apply your changes, restart GlassFish Server.
See "To Restart a Domain" in GlassFish Server Open Source Edition Administration Guide.
Example 1-15 Importing an RFC/Text-Formatted Certificate Into a JKS Keystore
Certificates are often stored using the printable encoding format defined by the Internet Request for Comments (RFC) 1421 standard instead of their binary encoding. This certificate format, also known as Base 64 encoding, facilitates exporting certificates to other applications by email or through some other mechanism.
keytool -import -noprompt -trustcacerts -alias ${cert.alias} -file
${cert.file} -keystore ${keystore.file} -storepass ${keystore.pass}
Example 1-16 Exporting a Certificate From a JKS Keystore in PKCS7 Format
The reply format defined by the Public Key Cryptography Standards #7, Cryptographic Message Syntax Standard, includes the supporting certificate chain in addition to the issued certificate.
keytool -export -noprompt -alias ${cert.alias} -file ${cert.file}
-keystore ${keystore.file} -storepass ${keystore.pass}
Example 1-17 Exporting a Certificate From a JKS Keystore in RFC/Text Format
keytool -export -noprompt -rfc -alias ${cert.alias} -file
${cert.file} -keystore ${keystore.file} -storepass ${keystore.pass}
See Also
To Delete a Certificate by Using keytool
Use the keytool delete command to delete an existing certificate.
Delete a certificate using the following command format:
keytool -delete
 -alias keyAlias
 -keystore keystore-name
 -storepass password
Example 1-18 Deleting a Certificate From a JKS Keystore
keytool -delete -noprompt -alias ${cert.alias} -keystore ${keystore.file}
-storepass ${keystore.pass}
See Also
Administering JACC Providers
The Java Authorization Contract for Containers (JACC) is part of the J2EE 1.4 specification that defines an interface for pluggable authorization providers. This enables the administrator to set up third-party plug-in modules to perform authorization.
GlassFish Server includes Administration Console support and subcommands to support JACC providers, as follows:
-
create
create-jacc-provider -
delete
delete-jacc-provider -
list
list-jacc-providers
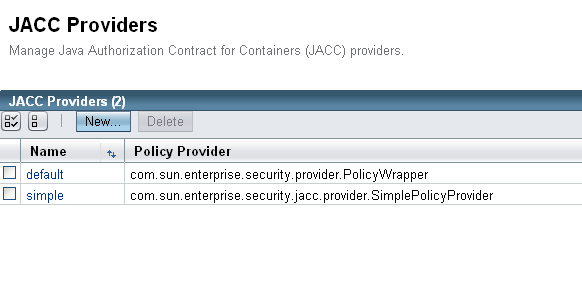
The default GlassFish Server installation includes two JACC providers,
named default and simple. You should not delete these default providers.
Any JACC providers you create with the create-jacc-provider subcommand
are in addition to these two default providers.
The GlassFish Server creates a JSR-115-compliant JACC provider that you
can use with third-party authorization modules for applications running
in GlassFish Server. The JACC provider is created as a jacc-provider
element within the security-service element in the domain’s domain.xml
file.
Administering JACC Providers From the Administration Console
To use the Administration Console to administer JACC providers, perform the following steps:
-
Select Configurations and expand the entry.
-
Select the server configuration for which you want to administer JACC providers and expand the entry.
-
Select Security and expand the entry.
-
Select JACC Providers. The JACC Providers page is displayed. The existing JACC providers are shown on this page.
-
To create a new provider, click New.
Enter the Name, Policy Configuration (the class that implements the policy configuration factory) and the Policy Provider (the class that implements the policy factory) for the new JACC provider. You can also enter optional properties (name/value) for the provider. -
To delete an existing JACC provider, select that provider and click Delete.
Administering JACC Providers from the Command Line
To use the command line to administer JACC providers, perform the following steps:
-
To create a JACC provider, use the
create-jacc-providersubcommand. The following example shows how to create a JACC provider named testJACC on the default server target.
asadmin> create-jacc-provider
       --policyproviderclass com.sun.enterprise.security.provider.PolicyWrapper
       --policyconfigfactoryclass com.sun.enterprise.security.provider.PolicyCon
figurationFactoryImpl
       testJACC
-
To delete a JACC provider, use the
create-jacc-providersubcommand. The following example shows how to delete a JACC provider named testJACC from the default domain:
asadmin> delete-jacc-provider testJACC
-
To list the available providers, use the
list-jacc-providerssubcommand. The following example shows how to list JACC providers for the default domain:
asadmin> list-jacc-providers
default
simple
Command list-jacc-providers executed successfully.